Tutorial: Wonders of the Wacky Wacom
Alright class, I’m back by request for some fine tuning of your little tablet buddy! In today’s lecture, I’ll talk about some of the setup nuances and getting the tools all situated before you start. The next tutorial will be more of the drawing side and a bit more directed to the comical folks, but I guess you could take some of the basics to heart for other things like digi painting.
So, lets get started shall we?
Bamboo, Intuos, Cintiq… whatever your poison is, these are the tools of the digital age of art. Pretty awesome when you think about it now, since the technology for all of this is relatively new, kinda like digital photo… but that’s another tutorial. What I’d like to talk about first, before getting into the drawing part, is getting it setup right. I mean, you don’t just squeeze out all your paints into a pile in front of you and start throwing chainsaws at it… right? Ok, that does sound like fun, but you have to get all of your tools set up first before you start chucking anything. (btw, this is from the perspective of an intuos, but some of this should apply to bamboo and cintiq)
1. The Setup & Pen
First off, follow the directions for installation… ok… now go to the wacom site and download all the new drivers and software! Alright, quick and easy. So moving on, we have a LOT to do with the preferences. These make or break your workflow. You see, the tablet has all these cool buttons and stuff on the sides, but the presets are just, what’s the word? Obnoxious. Yeah, that fits! lol! So lets get you up and running! Enough talk! Time for action! Kerpow!!
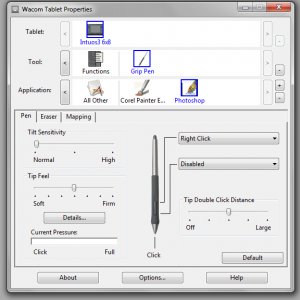
 So click your Start menu (sorry macies, I don’t remember where it is for you, I think just in the regular preferences), get wacom folder under programs and go to the Wacom Tablet Properties. Now, you’ll have a wonderful thingy with a lot of options. This is your set up panel. The first thing you see is the pen setup like in the first picture. IMPORTANT!! You can add specific programs to this list, such as Photoshop, so your settings will only effect that program. I’d go ahead and add Photoshop and make all your settings for that first, then you can do whatevers, I don’t know, Warcraft or something… why not?
Anyways, this seems like a fair place to start, you see, you can assign certain things for certain buttons and make life easy. Now, if you’re anything like me and slightly fumbly, you’ll want to just go ahead and disable the pen buttons. Why? Cause people like me will hit them every 5 minutes and pull up the right click menus or whatever and cause all kinds of horrible things to happen. So if you’re like me, save yourself some sanity and just nip that in the butt (bud?) right now.
You’ll notice just a few fun stuff on the tab, but you’ll want to get into photoshop to play with the sensitivity settings. Basically, default is ok, but if you tend to be a bit heavy or light handed, you may want to adjust it a little until your lines feel right. Don’t worry, it’s all applied real time so you can experiment.
2. Square = Square
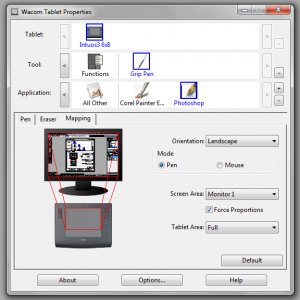
 Ok, this will bug the heck out of you if you don’t know what to look for. If you’re just starting out, you probably haven’t noticed or thought about it, but if your screen is anything but the exact proportions of your tablet… which… they’re not… then you NEED to set the proportions! Just go to the Mapping tab and check the “Force Proportions”. And there you have it! What would happen otherwise is this… if you tried to draw a circle, you’d get an oval, if you tried to draw a square, you’d get a rectangle. Forcing proportions will make is so that what you draw is what you get. You guys are probably more observant than I am, but it took me a few weeks to figure this out… sigh… Also, be warned, this will shorten your active area on your tablet, so there will be a good bit of “dead space” at the bottom. Sorry, can’t be helped. It’s for the greater good.
3. Presets Mapped By Clinically Insane Lizard People
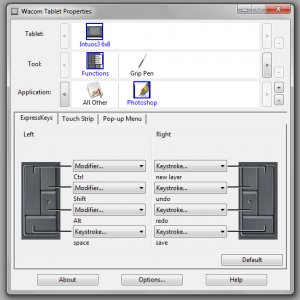
 Ok, we near the completion of today’s lesson with the third and final, though very important, is remapping the horrid presets for the left and right side buttons. Now, these will all come down to personal taste, but there’s a few essentials I think are super handy.
I set the bottom right button to be an instant save. Since Photoshop has no autosave, you absolutely, without question, need to develop a chronic OCD with hitting this button. I mean, you need to dream about hitting this button and have nightmares about not doing it.
I also set the up and down split to do “step back” and “step forward” aka undo/redo… I like the step functions better for some reason. idk… You can refer to the drop down menus in Photoshop to get the codes.
Oh, and I REALLY like having one of the buttons to make a new layer. I work in a LOT of layers so having this handy is a real time saver. (really, I just use the right set of buttons, it’s easier for me, but do what feels right)
All the other things can be assigned however you like. I set the right strip to just toggle guides on and off. And that’s about it. You can also make macros/actions and assign them too. Just highlight the action, click the >> menu thingy and go to Action Options. Set the Function to whatever you like, then set that up in the wacom preferences.
4. Key Mapping
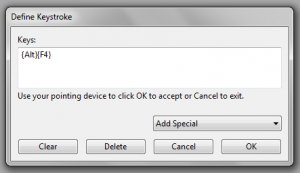
Right, probably should mention how to do it right? Simple really, on the wacom preference drop down menu select “Keystroke…” and simply just type what you want. Don’t uh… Don’t use Alt F4 though… >)

So, here endith the lesson! I know it’s probably not as luxurious as the next one to come, but this is kind of an important step in getting your tablet setup the way you like.